Requesting Status Updates from Pro Bono Advocates
This feature allows an organization to send status update requests to multiple pro bono advocates assigned to cases and track the responses.
Enabling Pro Bono Status Updates
Site administrators can enable the pro bono status updates tool by following these steps:
Pro Bono Settings
- Click on the Admin tab at the top of the page.
- Click on Pro Bono Management on the left side of the page and select Pro-Bono Settings from the list in the resulting screen.
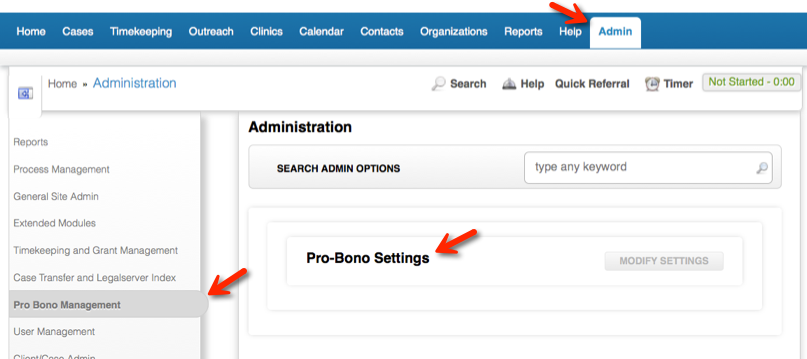
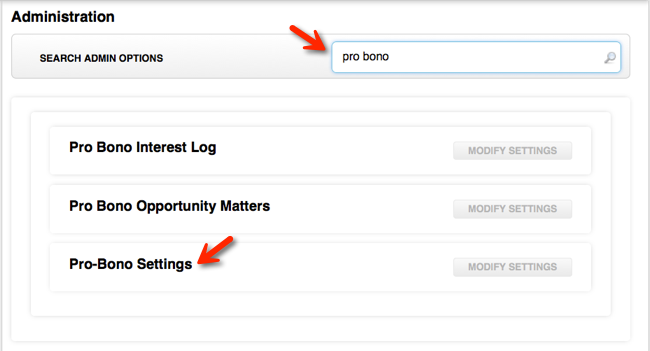
- Optionally, you can type "pro bono" in the Search Admin Options box and select Pro-Bono Settings from the list of results.
- In the Pro Bono Settings screen, make sure Enable Pro-Bono Status Updates is set to "Yes."
- Click Continue in the lower right corner to save your changes and return to the main Admin page.

Edit Main Profile
You will need to add the Status Update Requests list view to the main profile in the Case/Matter module so your users can track the status update requests.
- Click on the Admin tab at the top of the page.
- From the main admin screen, click on Process Management on the left side of the screen and select Processes, Forms, and Profiles from the list in the resulting screen.
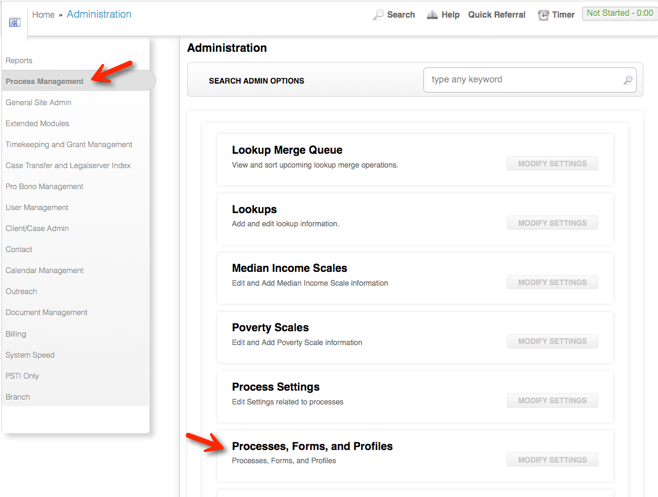
- Optionally, you can type "process" in the Search Admin Options box and select Processes, Forms, and Profiles from the list of results.

- Locate your site's Main Profile in the Case/Matter module profile list and open it for editing.
- Add the Status Update Requests list to the profile. In this example, the list view is part of a tab block on the main profile.

User Role Permissions
Next, click on User Management on the left side of the page and select User Roles (Permissions) from the list in the resulting screen.
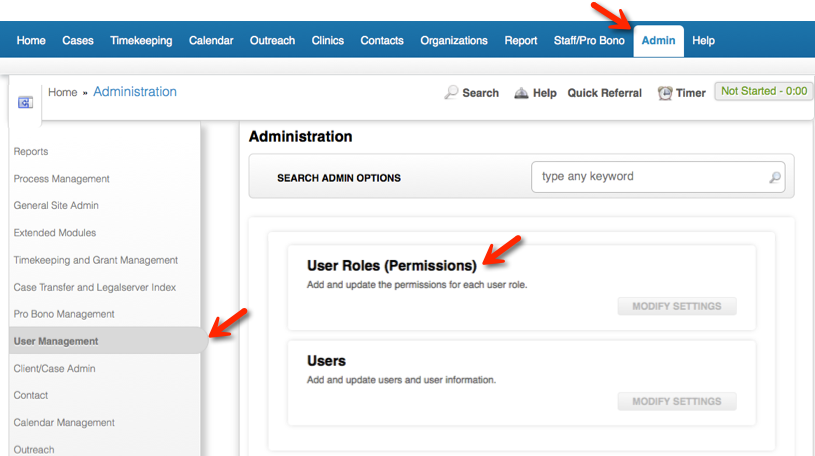
- Optionally, you can type "permissions" in the Search Admin Options box and select User Roles (Permissions) from the list of results.

- Select the user role you want to enable for the status update tool.
- Check the box next to Send Status Updates to give the user role the ability to send update requests.
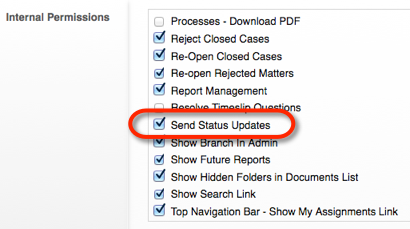
- Click Continue in the lower right corner to save your changes and return to the list of user roles.
Edit Home Page
The pro bono status updates tool includes a list view that you can add to your site's home page to help users quickly determine which cases have upcoming status update target dates.
- In order to use this list view, your site must be using a dynamic home page.
- If your site is not currently using a dynamic home page, you will need to create a dynamic profile for your site's home page.
- For instructions on creating dynamic profiles, see the Profiles section of the process management page. For specific information about configuring a dynamic home page, please see Home Page and Section Fronts - Customizing.
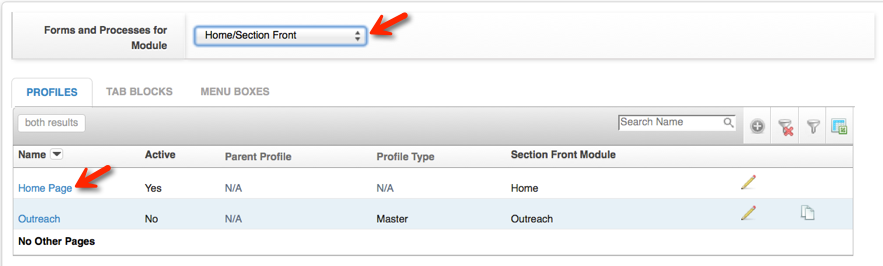
- You will need to add the Status Update Alert Listview block to your site's home page.
- In this example, the list view is part of a tab block at the top of the page, but your organization may want to use a different configuration.
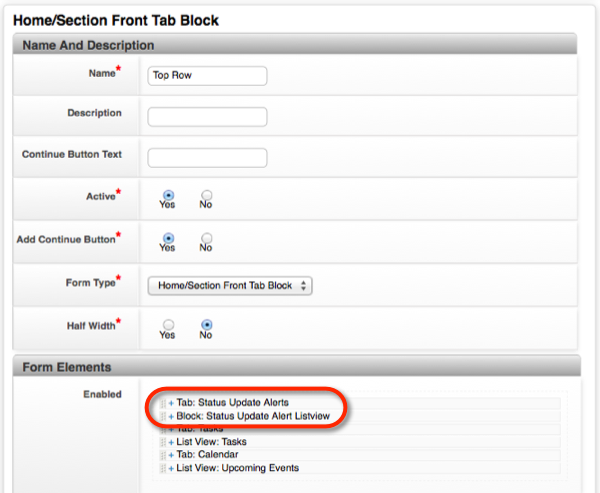
- The Status Update Alert list view block displays only open cases in your system with upcoming update target dates and those open cases with target dates that have passed with no response from the pro bono advocate to whom an update request was sent.
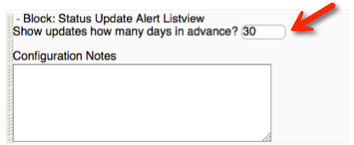
- You can set the time period captured by the list in the configuration options for the block. If you do not select a period, the system will display open cases with target dates coming up in the next 7 days. In this example, the period has been set to 30 days in advance.
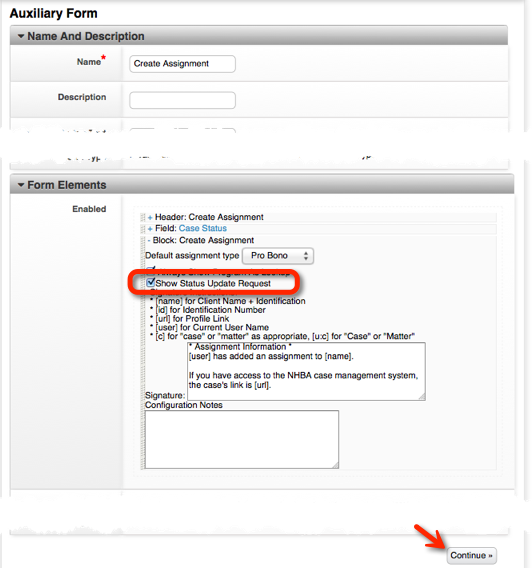
Edit Pro Bono Attorney Assignment Block
- NOTE: You must create a dynamic process for assigning pro bono attorneys in order for your site to use the pro bono status updates tool. This tool will not work with the static pro bono attorney assignment process. For instructions on creating dynamic forms and processes, please see Process Management.
- Open your site's dynamic pro bono attorney assignment form for editing.
- This form should already use the Create Assignment block. Click on the plus (+) sign next to the block to open its configuration options.
- Make sure the box next to Show Status Update Request is checked. This is required to set the initial status update target date.
- Click the Continue button in the lower right corner to save your changes.
Set Default Status Update Intervals for Legal Problem Codes
LegalServer gives you control over the default intervals between status update target dates based on the legal problem code associated with a case. To set the default intervals, follow these steps:
- Click on the Admin tab at the top of the page.
- Click on Extended Modules on the left side of the page and select Set Status Update Intervals for Problem Codes from the list in the resulting screen.
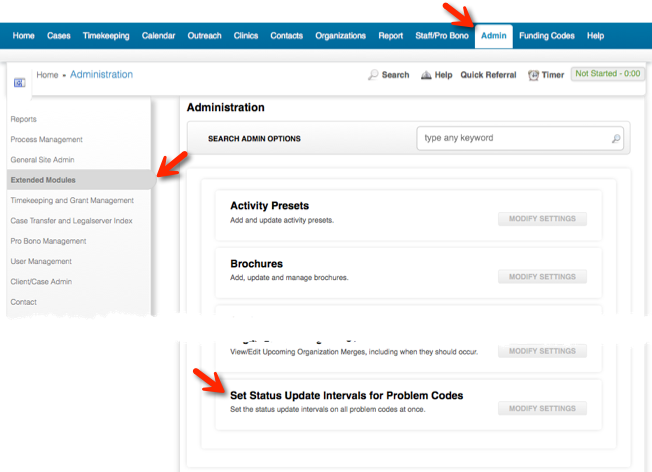
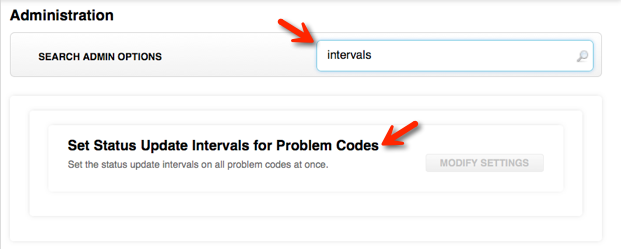
- Optionally, you can type "intervals" in the Search Admin Options box and select Set Status Update Intervals for Problem Codes from the list of results.
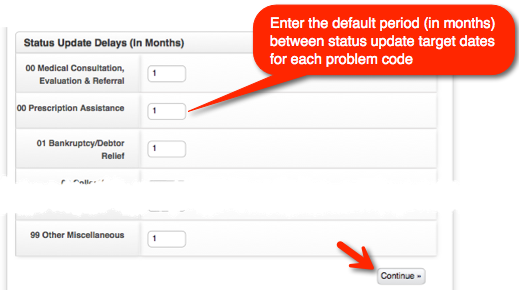
- You will now see a list of all the legal problem codes in your system. To set the default interval between status update target dates for each problem code, enter the number of months in the field next to each problem code.
- If you make any changes in this form, be sure to scroll down to the bottom of the page and click Continue in the lower right corner to save your changes.
Setting the Initial Status Update Target Date
With the pro bono status updates tool enabled, the first thing to do is to set the initial status update target date for a case. You can do this by following these steps:
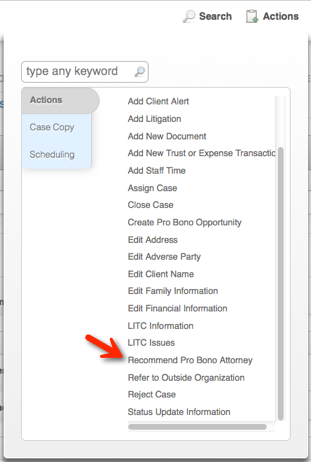
- Under the Actions menu, select Recommend Pro Bono Attorney. Depending on your site configuration, this may go by a slightly different name. (Actions links appear on the right side of the screen in the classic version.)
- For detailed instructions on assigning cases to pro bono advocates, see Recommending Pro Bono Advocates for Case Assignments.
- Once you've selected the pro bono advocate you want to assign to this case, click the Assign link next to the advocate's name. This will start the assignment process.
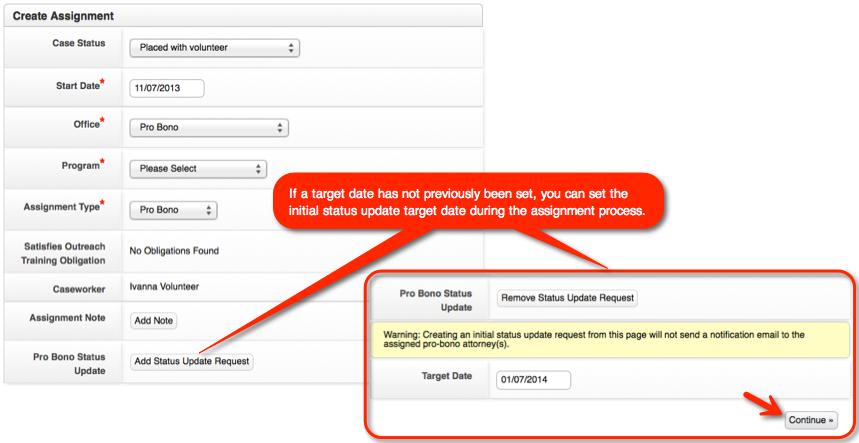
- In the first step of the assignment process, you can set the initial status update target date by clicking on Add Status Update Request, which will cause the status update target date field to roll down.
- The system automatically generates an initial target date based on the status update interval for this case's legal problem code. In this example, the interval is set to 2 months from the date of the first pro bono assignment.
- You can change the initial target date until you click Continue in the lower right corner. After you have saved the initial target date in the assignment process, you can only change it by editing it in the Status Update Requests list view. See the Editing the Status Update Target Date section of this page for details.
- If an initial status update target date has already been set for this case, the target date will display as a static field in the assignment screen.
Tracking Status Update Requests
LegalServer provides you with two tools that enable you to quickly determine which cases need status updates and track pending status update requests.
On the Home Page
On your site's home page, you will see a list view called Status Update Alerts that shows you at a glance which cases have upcoming update target dates, whether a request has already been sent, and whether the pro bono advocate has provided an update. Your site administrator must enable this list view for your system.
- This list displays all of the cases in your system with status update target dates coming up within a specified number of days.
- The time period displayed in this list view is set by your site administrator.
- This list also displays all of the cases in your system with target dates that have passed with no response from the pro bono advocate.

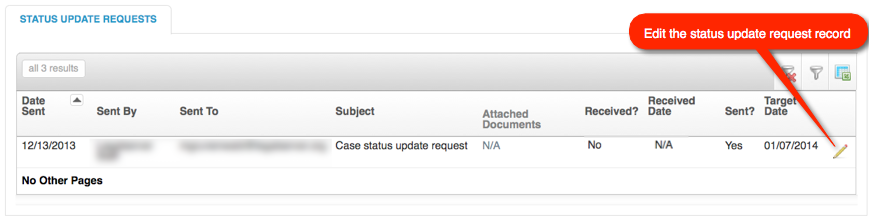
In the Case Profile
In the case profile, you will find a Status Update Requests list view that helps you track status update requests.
- The position of this list view on the case profile will depend on your site configuration.
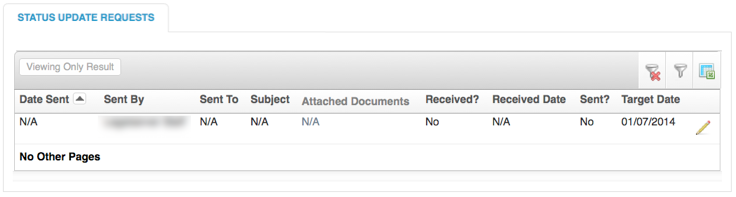
- This list view displays all of the status update records that have been created for this case.
- Clicking on the Edit icon in this list view will allow you to edit status update target dates and/or record the receipt of updates from pro bono advocates.
- See the Editing the Status Update Target Date and Recording Receipt of a Status Update sections of this page for details.
Editing the Status Update Target Date
After you have set the initial status update target date, or if the case already has a status update target date, you can edit the date in the case profile by following these steps:
- In the case profile, find the Status Update Requests list view. In this example, this list view is part of a tabblock. Your case profile screen may look different depending on your system configuration.
- This list view displays all of the status update target dates that have been set for this case.
- Find the current update target date and click on the Edit icon to change it. (In the classic version, you will click on the Edit link.)
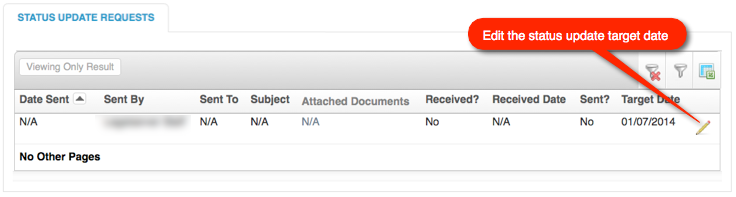
- In the edit screen, enter the new date and click Continue in the lower right corner to save your changes.

Sending Status Update Requests
- Click on the Admin tab at the top of the screen.
- Click on Client/Case Admin on the left side of the page and select Status Update Requests from the list in the resulting screen.
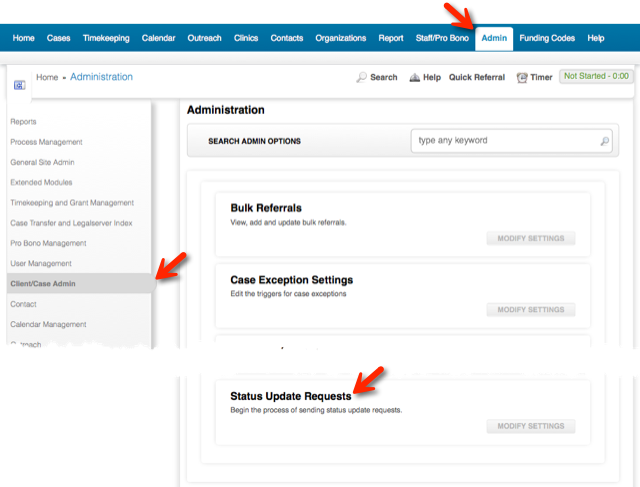
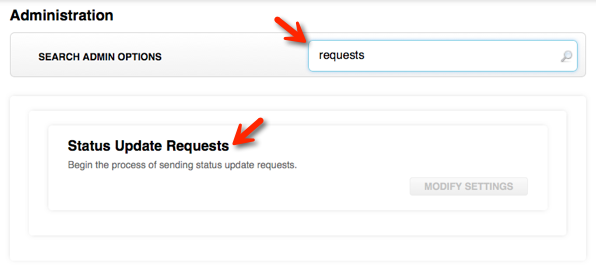
- Optionally, you can type "requests" in the Search Admin Options box and select Status Update Requests from the list of results.
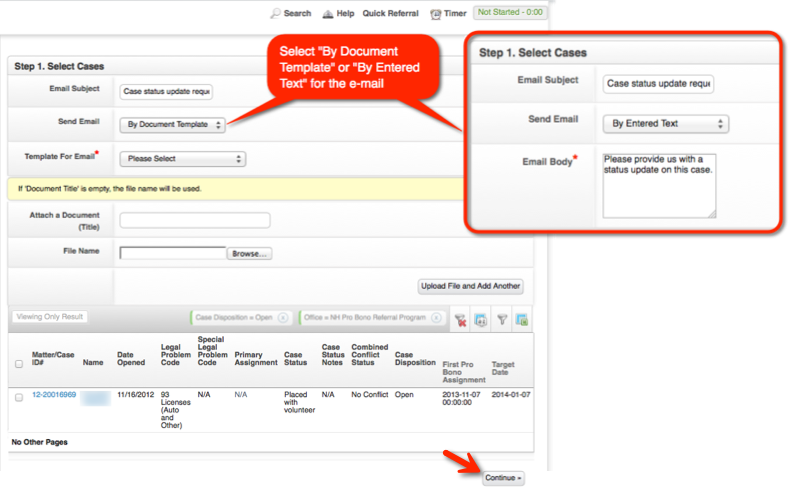
Step 1. Select Cases: Select the format of the e-mail and the cases for which you want to send status update requests.
TIP: The Template for Email dropdown lists all documents in your system that have been designated as "New Style Document Template." For more information about document templates, see Document Templates - Creating and Editing.
- Use the Target Date filter to limit the case list to a specific time period.
- For this example, we've selected only one case, but you can select multiple cases.
- Click the Continue button in the lower right corner to save and move to the next step.
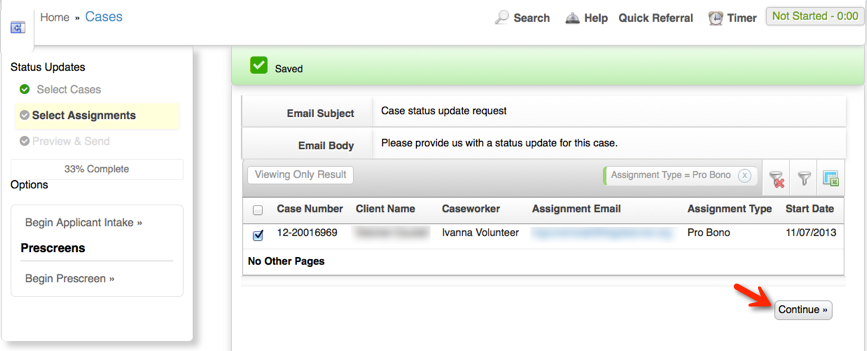
Step 2. Select Assignments: You will see a list of the pro bono advocates assigned to the cases you selected in the previous step.
- Select the pro bono advocates to whom you want to send status update request e-mails.
- Click the Continue button in the lower right corner to save and move to the next step.
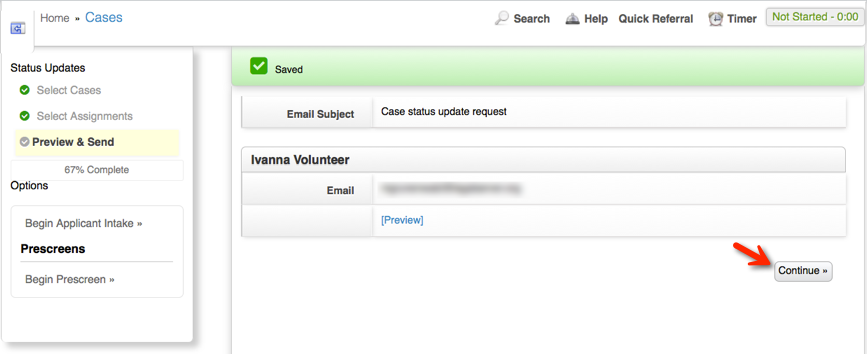
Step 3. Preview & Send: You can view a preview of the e-mails you're about to send to each pro bono advocate you selected in the previous step.
- Click the Continue button in the lower right corner of the screen to send the e-mails.
- Note: The "From:" on the emails will be the email address of the user sending the updates.
Recording Receipt of a Status Update
After status update requests have been sent, you can record receipt of updates as you receive them from pro bono advocates by following these steps:
In the case profile, find the Status Update Requests list view. In this example, this list view is part of a tab block. Your case profile screen may look different depending on your system configuration.
This list view displays all of the status update target dates that have been set for this case.
Find the update request for which you have received an update and click on the Edit icon to edit this record. (In the classic version, you will click on the Edit link.)
Select "Yes" in the Received? field to record receipt of the status update.
Then enter the date you received the update from the pro bono advocate in the Received Date field.
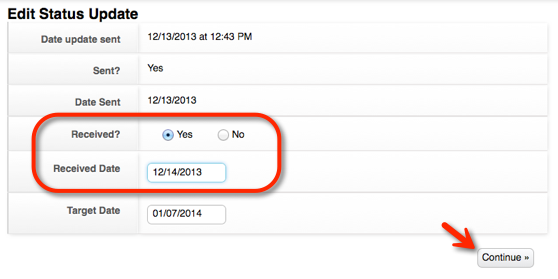
Click the Continue button in the lower right corner to save and return to the case profile.
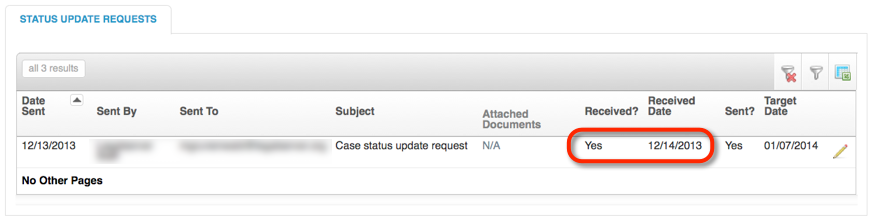
In the Status Update Requests list view, you will see the changes you made to the record, as shown below.
Reports
Use the Case Data > Status Update History subtable.